I recently bought a used 2007 Ford Escape Hybrid and it had the Ford Navigation CD Player installed.

This head unit has AM/FM, hybrid status, and fuel consumption views. The navigation unit gets its data from a $199 12-CD map pack. Each CD contains a geographic region of North America. The last version of the CD map pack was 4V in 2007. My 2007 Escape came with the 2005 CD map pack which is better than nothing in this year of 2016.
The navigation CD is loaded into the top CD drive and the audio 6 CD changer is located underneath the passenger seat.
There is no audio AUX input.
The only AUX input accessory I found that had a good chance of compatibility was the AUX-FRDW Auxiliary Input Jack for $60. This accessory went inbetween the head unit and the CD changer. It appears to wire the 3.5mm audio input to the right pins of the CD changer connector.
Can we figure out the correct CD changer pinout? Yes, for cheap price of a spare audio cable, we can add in our own AUX input to the 2007 and earlier year Ford Escapes.

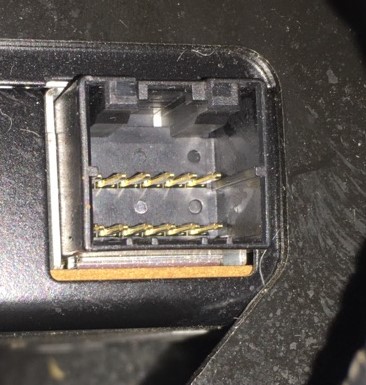
The 6 CD changer is connected to the head unit through a 12 pin pigtail connector. This is a WPT164 connector.
After some searching, I found the similar CD changer pinout of the Ford Taurus.

The pins we will be using are 1/2 and 7/8.

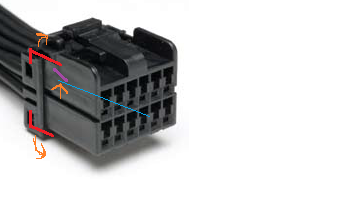
After you strip an audio cable which you will use as the AUX input wire, there will be three wires. The white wire is the left audio channel and red wire is the right audio channel. The remaining wire is the ground that completes the circuit for the audio channels. The above audio pinout diagram shows what we will be doing. Right and left channels will be connected to the WPT164 pins 7 and 8 respectivelyand we will be splitting the single ground to pins 1 and 2 to complete the left and right audio circuit.
My CD changer’s 12 pin connector was located on the right side of the unit. You must depress the top plastic lever of the connector to detach it from the unit.
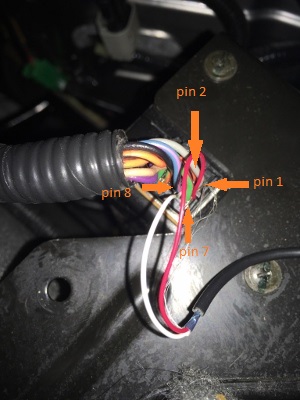
Remember to keep track of the correct pin color to pin slot when you remove them.
To remove pins 1, 2, 7, and 8 from the connector you need to flip back the black tabs (red) above. The tabs running along the back of the connector hold the pins in place. Next you must insert a thin flathead (blue) into the bigger top opening for the correct pin (pin 1 is indicated in the picture). There is a lever (purple) inside each pin slot that stays down to prevent the pins from being removed. Use the flathead to lift the lever and pull the correct wire for the pin from the back at the same time. The pin will slide out.
Attach the red audio wire to the pin from slot 7. Attach the white audio wire to the pin from slot 8. Split the ground wire and connect one side to pin 1 and the other side to pin 2.
I twisted each wire and inserted it into the free space that remained in each pin. You may find another method that works better with your resources at hand such as soldering.
Reinsert the pins into their original connector slots.
Create or download a long (30 minutes or more) silent mp3 file and burn it to a CD. The CD changer will signal to the head unit that there is a CD that can be played. Put the CD in to the CD changer and switch your head unit to play from the CD changer. The head unit will play the silent mp3 file.
Plug your audio source into the audio cable connected to the 12 pin connector. Now you can play audio from your added audio aux input.
