The SUNLU Terminator 3 printer needs the below modifications before it is ready for use. These steps aren’t clearly explained for new users and have been experimentally determined.
But first, the usual…
Update the printer firmware to the latest version
Download the latest firmware (v3.40 24OCT22 at time of writing) from http://3dsunlu.com/Content/2169603.html.
Open the Readme file in Notepad and follow the directions listed. If there is just one firmware file for your language, follow the Readme steps for the first firmware file.
Manually level the bed
Set the Z-offset from the printhead BLTouch autoleveling sensor to the bed under Motion > Level > Z-Offset. When selecting the Z-Offset menu item, the printer will home/zero X,Y,Z directions and then position the printhead at the center of the bed for you to electronically adjust the Z-offset.
You can use a piece of paper to determine a Z-offset with moderate resistance when pulling the paper between the nozzle and the bed.
Afterwards, level the bed corners through Motion > Level > Manual Level (Bed Tramming). The nozzle will move to each of the bed corners and you can physically adjust the bed springs at each corner to get the same height across all corners using the paper method above.
Optimized Printer Firmware Configuration
Turn off Jam Detection
Jam detection does not work correctly in firmware v3.40. It will detect a jam when there is no jam leading to nozzle being automatically parked and filament purged.
Jam Detection can be turned off in Configuration > Jam > OFF
Turn off Power Loss Detection
Power Loss Detection can be turned off in Configuration > Power Loss > OFF
Turn off Auto Bed Leveling (ABL) for calibration prints
If you leveled your bed manually, ABL may not be necessary for all prints. Turning ABL off on a manually leveled bed can save some time by skipping the 4x4 mesh leveling detection at the beginning of a print.
Turn ABL off in Configuration > AUX Level > OFF
Increase Acceleration
The printer’s preset acceleration is fairly low and can be increased. There is no need for Fast Mode if your acceleration and speed is tuned.
Change acceleration values in Configuration > Advanced Settings > Acceleration
| Field | Value |
|---|---|
| Accel | 800 |
| A-Retract | 1000 |
| A-Travel | 800 |
| A-Travel | 800 |
| Amax X | 1500 |
| Amax Y | 1500 |
| Amax Z | 100 |
| Amax E | 5000 |
Turn off Fast Mode
See previous note on Acceleration.
Turn off Runout Detection
The automatic filament loading under Change Filament does not have the correct bowden tube length calculated. It will continuously extrude filament without stopping. Do not use the automatic filament loading.
The bowden tube length is used during the filament change procedure for runout detection so Runout Detection should be turned off in Configuration > Runout Detection > OFF.
Cura Printer Profile and Settings
SUNLU has the SUNLU T3 configuration files available for download at http://3dsunlu.com/Content/2169603.html listed as Mac Cura configuration.
The downloaded Cura printer profile files can be copied into your Cura configuration directory on Mac or Windows.
When you launch Cura, you can add the preset T3 printer by selecting it under the non-networked printer list. If you imported the T3 printer profile correctly, the printer settings should look similar to below.
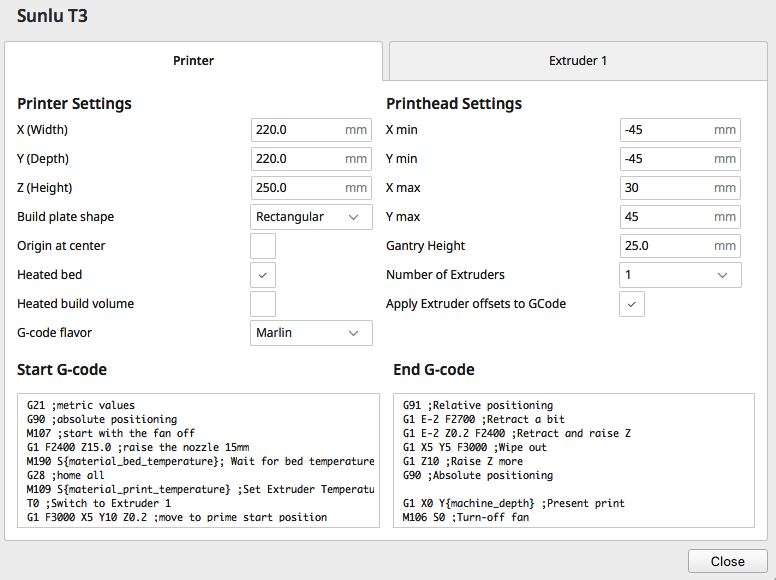
The filament diameter under Extruder 1 should be set at 1.75 mm and not 2.85 mm.
SUNLU’s provided Start G-code heats up the extruder before heating the bed. The bed takes the longer of the two to heat up so it should be heated first to avoid oozing or burning heated filament from a hot nozzle. Homing Z axis should be done with a heated bed to compensate for any expansion but not a heated nozzle to avoid a hot nozzle from damaging the plastic bed.
SUNLU’s provided End G-code has the wrong Y axis value of 270 mm for the final position. The T3 Y axis has a maximum value of 220 mm so the printer crashes the bed into the Y axis limit trying to move to 270 mm.
The corrected Start G-code:
G21 ;metric values
G90 ;absolute positioning
M107 ;start with the fan off
G1 F2400 Z15.0 ;raise the nozzle 15mm
M190 S{material_bed_temperature}; Wait for bed temperature to reach target temp
G28 ;home all
T0 ;Switch to Extruder 1
M109 S{material_print_temperature} ;Set Extruder Temperature and Wait
G1 F3000 X5 Y10 Z0.2 ;move to prime start position
G92 E0 ;reset extrusion distance
G1 F600 X160 E15 ;prime nozzle in a line
G1 F5000 X180 ;quick wipe
G92 E0 ;reset extrusion distance
The corrected End G-code:
G91 ;Relative positioning
G1 E-2 F2700 ;Retract a bit
G1 E-2 Z0.2 F2400 ;Retract and raise Z
G1 X5 Y5 F3000 ;Wipe out
G1 Z10 ;Raise Z more
G90 ;Absolute positioning

G1 X0 Y{machine_depth} ;Present print
M106 S0 ;Turn-off fan
M104 S0 ;Turn-off hotend
M140 S0 ;Turn-off bed

M84 X Y E ;Disable all steppers but Z
Cura Print Settings
Download and import my optimized T3 Cura print settings profile here.
Changes with the greatest impact are layer height, ironing, and pattern:
| Setting | Value |
|---|---|
| Layer Height | 0.12 |
| First Layer Height | 0.24 |
| Ironing Acceleration | 700 mm/s² |
| Ironing Flow | 20% |
| Ironing Inset | 0.3 mm |
| Ironing Line Spacing | 0.2 mm |
| Ironing Speed | 150 mm/s |
| Top/Bottom Pattern | zigzag |
What’s next for your T3 printer?
The T3 printer seems to be based on Marlin firmware, a project under the GNU GPL v3.0 license. GPL v3.0 requires that manufacturers that modify the Marlin firmware release their changes.
SUNLU has not released the T3 printer source code which would include Marlin configuration files.
When/if the Marlin configuration files are released, you will be able to use improvements and features from the updated Marlin firmware on the T3 printer.
The T3 is very similar to the Ender 3 Pro, I haven’t looked underneath at the electronics but I wouldn’t be surprised if it’s a clone of the Ender 3 Pro and the Ender 3 Pro Marlin configuration could be used with some modifications.
